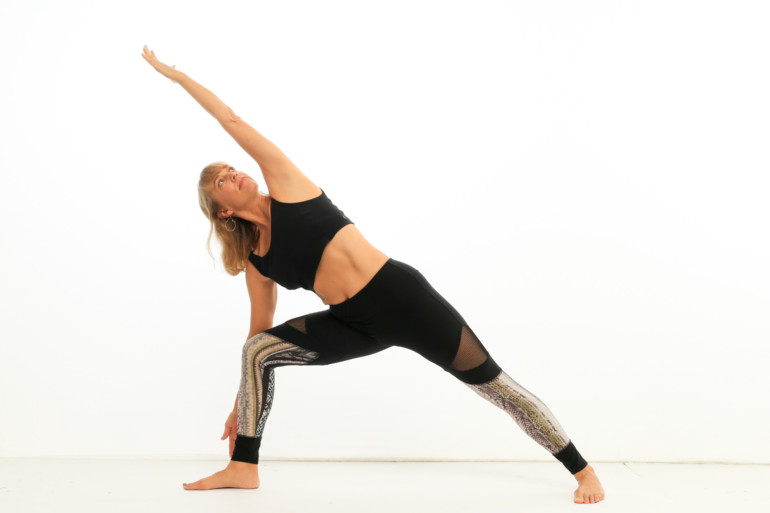
Utthita Parsvakonasana (oo-TEE-tah PARZH-vuh-ko-NAHS-uh-nuh), also known as Extended Side Angle Pose is a majestically beautiful pose, especially when done with precision. An untrained eye can easily tell when this pose is done correctly because it is so straight and purposeful. And yet, it is a pose that is not easy to master because so much is going on simultaneously. The end result is forming a straight incline on the entire side of your body from the outer edge of your foot to your fingertips.
This pose strengthens and stretches your body so much that it is practically impossible to list all of the benefits, but I will try: stretching the foot, ankle, groin, hip, oblique muscles, shoulders and arm on one side of the body; stretching the hamstrings and neck on the other. While all of that stretching is taking place, you are also strengthening your feet, ankles, thighs, hips, oblique muscles, arms and neck. Your organs are also getting stretched and massaged.
SIMPLE STEPS:
- From the top of your mat, step your left foot back about one leg distance from your right foot.
2. Turn your right (front) toes toward the front of your mat. Your left toes will stay facing the side of your mat, but turn that foot in slightly. The feet should be in one line on your mat.
3. Bend your front knee until it is situated over your ankle. If you are able, sink down into the pose even more and widen your stance, but make sure that your knee is still over the ankle and in line with your middle toe.
4. Start to hinge your torso toward the front of your mat while you point your tailbone back behind you. Place your front elbow on the knee for a moment and take a couple of breaths with your upper arm reaching to the ceiling.
5. When you feel your hips open and release, place your right hand or fingertips on the outside of the ankle. Have a block nearby in case you need it to support a long straight spine. Press your bent knee toward your arm to keep it from rotating inward.
6. Place your upper (left) and on your upper thigh and then glide it up the side of your body and continue to extend the arm overhead, biceps by the ear, reaching your fingertips beyond the front of your mat. Keep your neck long and your shoulder down and away from your ears.
7. Press the outer edge of your back foot down, making one straight line at an incline and reaching all the way through your fingertips. Keep your tailbone pointing toward the back of mat.
8. If it does not hurt your neck, lift your gaze upward.
9. Focus on breathing which will give you the energy you need to sustain this pose. See if you can stay in the pose for five full breaths.
10. Carefully release the pose by pressing down into the feet and lifting the torso up. Straighten the front leg and turn the toes to the side of your mat.
11. Repeat all of the above on the other side.
TIPS
If the body is not straight and there is a curve in the spine, it will look and feel uncomfortable. If this happens, use a block to add a lift under the lower hand. Another modification is to place the forearm of the lower hand on the knee. If you use this modification, don’t slouch into it. Keep the energy lifted without a lot of weight on the leg.
Use your breath to sustain the strength you need and stay here through five smooth rounds of breathing.

